

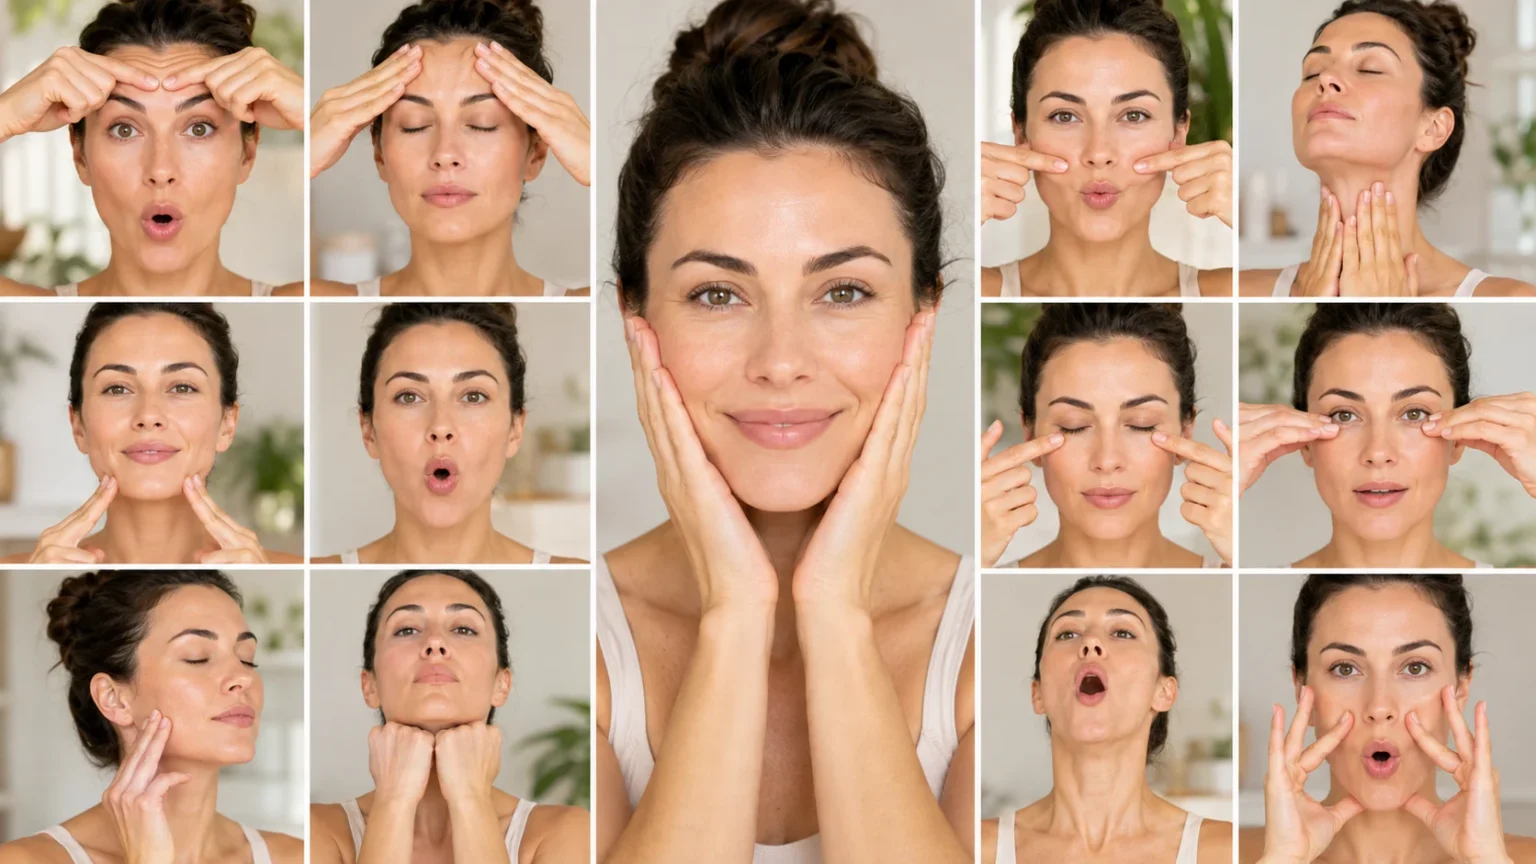

Face Yoga: Follow These 10 Moves for a Firmer Look
Face Yoga is a collection of controlled facial movements designed to engage, stretch or relax the muscles beneath the skin. The exercises usually target areas such as the forehead, cheeks, eyes, jawline and neck. Unlike injectable treatments or cosmetic procedures, facial exercises require no specialist equipment and can be practised at home.
Supporters believe that exercising facial muscles may make certain areas appear fuller, more lifted or better defined. A small 20-week pilot study found improvements in upper and lower cheek fullness among participants following a structured facial exercise programme. However, the study included only 16 women, had no control group and experienced numerous participant dropouts.
The wider evidence remains limited. A 2025 systematic review found some promising changes in muscle tone, skin elasticity and subjective appearance, but the included studies were small and used inconsistent methods. Researchers concluded that stronger, standardised trials are still needed before facial exercises can be considered a proven rejuvenation treatment.
This guide provides 10 gentle face yoga exercises for the forehead, eye area, cheeks, mouth, jawline and neck. The goal is not to erase wrinkles or change your natural face shape. Instead, use the movements to improve facial awareness, release unnecessary tension and explore whether consistent practice creates subtle changes in your appearance.
Does Face Yoga Work?
Facial appearance changes with age because of several processes occurring beneath and above the skin. Skin becomes thinner and drier, while changes in facial fat, muscle and supporting structures affect fullness and contour. Genetics, sun exposure, smoking and daily skin-care habits also influence how quickly visible signs of ageing appear.
Facial exercises may increase the activity of selected muscles, potentially adding a small amount of volume beneath certain areas. In the best-known pilot study, participants completed 30 minutes of exercises daily for eight weeks and then every other day until week 20. The strongest measured improvements occurred in cheek fullness rather than forehead lines, crow’s feet or the jawline.
That distinction matters because face yoga is frequently promoted as a solution for every visible concern, from wrinkles to facial fat. Current research does not show that it can remove a double chin, permanently tighten loose skin or replace lost facial volume. Results, when they occur, are more likely to be subtle and will vary according to age, anatomy and consistency.
Repeatedly pulling, squinting or forcefully creasing the skin may also be counterproductive. The American Academy of Dermatology notes that repeatedly contracting the same facial muscles over many years can contribute to permanent expression lines. For that reason, the exercises below focus on controlled resistance and relaxation rather than aggressive scrunching.
Before You Begin
Practise in front of a mirror for the first few sessions. A mirror helps you notice whether you are unnecessarily wrinkling the forehead, squeezing the eyes or clenching the jaw. Your movements should feel controlled and comfortable, without pulling the skin hard or creating pain in the face, head or neck.
Wash your hands and begin with a clean face. Apply a small amount of lightweight moisturiser when your fingers need to glide across the skin, but avoid thick or slippery products that reduce control. Dermatologists recommend gentle cleansing and moisturising because excessive rubbing and irritation can make skin look and feel worse.
Sit upright with your shoulders relaxed, chin level and tongue resting comfortably inside your mouth. Breathe slowly through your nose whenever possible. Good posture will not reshape facial bones, but it helps you perform jaw and neck movements without forcing the head forward or placing unnecessary strain on the cervical spine.
Start with one set of each movement and use light resistance. Stop immediately if you experience sharp pain, dizziness, jaw clicking that becomes painful, eye discomfort or a headache. People recovering from facial surgery, dental procedures, injectable treatments or facial nerve conditions should ask their clinician when facial exercises can be resumed safely.
1. Forehead Smoother
This forehead exercise focuses on relaxing the muscles that lift the eyebrows and create horizontal forehead lines. Many people raise their brows while concentrating, reading or looking at screens. The purpose of this movement is to build awareness of that habit rather than aggressively stretching already delicate skin.
Place the fingertips of both hands lightly across the forehead, just above the eyebrows. Apply gentle downward resistance while slowly attempting to raise your eyebrows. Keep your eyes relaxed and avoid pressing hard enough to drag the skin or create discomfort around the brow bone.
Hold the resistance for five seconds, then completely release the forehead for five seconds. Repeat the movement five times while breathing normally. Try to keep the scalp, jaw and shoulders relaxed so that the effort remains focused around the eyebrows instead of spreading across the entire face.
Finish by closing your eyes and consciously allowing the eyebrows to rest in a neutral position. This relaxation phase is important because constantly contracting the forehead may reinforce expression lines. The exercise should feel like mild muscular work followed by release, not like forceful pulling or skin manipulation.
2. Brow Lifter
The brow lifter is a gentle resistance movement for the muscles around the eyebrows and upper forehead. It is often included in routines marketed as face exercises for wrinkles, although evidence that it removes forehead lines is lacking. Treat it as a muscle-control exercise rather than a substitute for professional wrinkle treatment.
Place your index fingers directly beneath the outer halves of your eyebrows. Support the brows lightly without digging into the skin. Attempt to lower your eyebrows while your fingers provide a small amount of upward resistance, keeping the eyelids soft and the forehead as smooth as possible.
Hold the position for four to five seconds, then release it slowly. Complete five controlled repetitions without squinting or squeezing the bridge of your nose. Less pressure is usually more useful because excessive force may create additional creasing around the eyes and forehead.
After the final repetition, remove your fingers and blink naturally several times. Check that both eyebrows return to a comfortable resting position. Facial asymmetry is normal, so do not force one side to match the other or increase resistance on one eyebrow without professional guidance.
3. Eye-Area Relaxer
The skin surrounding the eyes is thin and should be treated gently. This exercise does not involve stretching the eyelids or pulling at crow’s feet. Instead, it helps you notice habitual squinting and practise opening the eyes comfortably while keeping the forehead and jaw relaxed.
Look straight ahead and soften your gaze. Place your fingertips on the temples as a reminder not to contract the surrounding muscles, but do not pull the skin outward. Slowly widen your eyes until you feel alert without raising the eyebrows or creating tension across the forehead.
Hold the open, relaxed gaze for three seconds, then close your eyes softly for three seconds. Repeat six times while keeping your breathing steady. The eyelids should meet naturally during each closure rather than being squeezed together with force.
Stop if the movement causes dryness, twitching, blurred vision or discomfort. Face yoga cannot treat drooping eyelids, impaired vision or persistent swelling around the eyes. New visual symptoms, significant asymmetry or difficulty closing one eyelid should be assessed by a qualified healthcare professional.
4. Cheek Lifter
The cheek lifter engages the muscles used when smiling and raising the mid-face. Cheek-focused movements have received the most encouraging findings in the small facial exercise study, where upper and lower cheek fullness improved after 20 weeks. Those findings remain preliminary and should not be interpreted as guaranteed lifting.
Form an open-mouth smile by covering your upper teeth gently with your upper lip. Lift the corners of your mouth as though you are creating a broad smile, but keep the eyes and forehead relaxed. Place your fingertips lightly on the upper cheeks to feel the muscles engage.
Raise and lower the cheek muscles slowly 10 times without pushing upward with your fingers. On the final repetition, hold the lifted position for five seconds before releasing. Keep the movement smooth so the skin does not repeatedly bunch around the eyes or sides of the nose.
You should feel mild effort across the centre of the cheeks rather than pain in the jaw. Reduce the size of the smile if your jaw begins to click or fatigue. Consistency and control are more important than creating the widest possible expression during this cheek lifting exercise.
5. Cheek Sculptor
This exercise applies gentle resistance to the cheek muscles without forcefully pinching or rubbing the skin. It may complement the cheek lifter by asking the muscles to hold a rounded position. It cannot remove cheek fat, change cheekbones or reproduce the effects of dermal fillers.
Close your lips and fill both cheeks with a comfortable amount of air. Move the air slowly into the right cheek, then across the upper lip area, into the left cheek and finally below the lower lip. Keep the pressure moderate so the mouth and jaw remain comfortable.
Complete five slow circles in one direction and then five in the opposite direction. Rest briefly between rounds if the muscles around your lips become tired. Try to prevent the air from escaping while avoiding an excessively tight lip seal.
Release the air and relax your mouth completely after each set. People with jaw pain, recent dental work or sensitive facial nerves should avoid prolonged pressure inside the cheeks. This movement should feel playful and controlled rather than forceful or exhausting.
6. Smile-Line Relaxer
Smile lines are natural folds extending from the sides of the nose toward the mouth. Their appearance reflects facial anatomy, skin changes and movement, so one exercise cannot erase them. This technique focuses on relaxing tension around the lips and cheeks without repeatedly deepening the folds.
Form a small “O” shape with your mouth while keeping the lips relaxed over the teeth. Place one fingertip beside each corner of the mouth as a light reference point. Slowly transition from the “O” shape into a gentle closed-mouth smile.
Move between the two positions six times, taking approximately three seconds for each transition. Keep your cheeks smooth and avoid pressing your fingers into the folds. The fingers should simply help you notice whether the left and right sides are moving comfortably.
Finish with your lips resting loosely together and your teeth slightly separated. Constant jaw clenching can create unnecessary tension around the lower face, so relaxation is as important as contraction. Do not expect the movement to permanently fill or flatten established nasolabial folds.
7. Jaw Release
The jaw release is designed to reduce awareness of clenching and encourage smooth jaw movement. It may feel useful after long periods of concentration or screen use, but it is not a treatment for temporomandibular joint disorders. Persistent jaw pain, locking or restricted opening needs professional assessment.
Place the tip of your tongue gently on the roof of your mouth, just behind the upper front teeth. Keeping the tongue in place, slowly open your mouth until you feel a comfortable stretch. Stop before the jaw clicks, shifts sideways or becomes painful.
Hold the open position for three seconds and then close the mouth slowly. Repeat five times while keeping the shoulders down and the neck long. The movement should remain small when your jaw is naturally tight or sensitive.
After the final repetition, let the lips meet while keeping a small space between the upper and lower teeth. Notice how this differs from clenching. Avoid chewing motions, exaggerated side-to-side movements or strong resistance when you have jaw tenderness or a history of joint problems.
8. Jawline Press
The jawline press uses gentle isometric resistance beneath the chin. It is commonly described online as face yoga for the jawline, but it cannot alter the shape of the jawbone. At most, consistent practice may improve awareness and control of the muscles supporting the lower face and upper neck.
Make a loose fist and place it beneath the centre of your chin. Try to open your mouth slowly while the fist provides light upward resistance. Keep your head level instead of lifting the chin or allowing the neck to lean backwards.
Hold for four seconds, then release for four seconds. Complete five repetitions using approximately 20 to 30% of your available strength. Stronger pressure does not necessarily produce a better result and may aggravate the jaw joint or nearby muscles.
Remove your fist and open and close the mouth gently once or twice. Stop the exercise if you notice pain near the ears, headaches or increased clicking. A defined jawline depends heavily on genetics, bone structure, fat distribution and skin elasticity, not facial exercise alone.
9. Chin and Neck Lift
This movement is often promoted as face yoga for a double chin, but facial exercises cannot selectively burn fat beneath the chin. The exercise instead engages the front of the neck and lower-face muscles. Any visible result is likely to be modest and will vary considerably between individuals.
Sit tall and tilt your head slightly upward without collapsing the back of your neck. Keep your lips closed, then move the lower lip upward as though trying to cover the upper lip. You should feel gentle engagement beneath the chin and along the front of the neck.
Hold for five seconds before returning your head to a neutral position. Repeat five times and pause whenever the neck feels tired. Keep the movement small if you have stiffness, headaches or limited neck mobility.
Avoid throwing the head far backwards or forcing the lower jaw forward. Those actions can compress the neck or irritate the jaw. People with cervical spine problems, dizziness or recent neck injuries should seek professional guidance before attempting head-tilting exercises.
10. Posture Reset
Forward-head posture can make the neck feel strained and may change how the lower face appears in photographs. A posture reset does not tighten loose skin, but it can help you hold the head over the shoulders more comfortably. It also provides a calm finishing movement for a facial yoga routine.
Sit or stand with your back tall and look directly ahead. Without lowering your gaze, draw your chin straight backwards as though making a small double chin. Keep the movement horizontal rather than tipping the chin down toward the chest.
Hold the position for five seconds and then relax. Repeat eight times while keeping your shoulders down and breathing normally. You should feel mild work at the front of the neck and a gentle lengthening sensation near the base of the skull.
Finish by rolling your shoulders backwards once and allowing your head to rest naturally above your torso. Practise this reset during computer or phone use, but do not hold a rigid posture all day. Comfortable movement and regular position changes are more sustainable than forcing the body into one fixed alignment.
Build a 10-Minute Routine
Begin with one minute of relaxed breathing and posture awareness. Follow with the forehead smoother, brow lifter and eye-area relaxer for approximately three minutes. Keep every contraction gentle and release the muscles completely between repetitions to avoid turning the routine into continuous facial tension.
Spend the next three minutes on the cheek lifter, cheek sculptor and smile-line relaxer. Work slowly rather than rushing through the repetitions. Performing the exercises in front of a mirror can help you prevent unwanted squinting, jaw clenching or excessive skin creasing.
Use the final three minutes for the jaw release, jawline press, chin and neck lift, and posture reset. You do not have to perform every exercise daily. Select five or six comfortable movements and alternate areas across the week when a full routine feels too demanding.
Practise three to five days per week at first. Taking occasional rest days allows you to notice whether an exercise is creating soreness or tension. The pilot study used a far longer 30-minute programme, but its small sample and high dropout rate mean there is no proven ideal duration for results.
When Results May Appear
Face yoga is unlikely to produce an overnight transformation. In the 2018 pilot study, participants trained daily for eight weeks and then every other day until week 20. Improvements were mainly measured at the end of the longer programme, which suggests that any visible change may require months rather than days.
Even after 20 weeks, results were not seen across every facial feature. Cheek fullness improved, while measured changes in forehead lines, crow’s feet, nasolabial folds and jawline were not statistically significant. The study’s small size, lack of a control group and self-selected participants make its findings difficult to generalise.
Take a neutral photograph before beginning and another every four weeks if you want to monitor progress. Use the same lighting, camera distance, head position and facial expression each time. Daily mirror checks are less helpful because small differences in light, hydration and expression can easily affect how your face appears.
Be cautious with dramatic face yoga before and after images online. Changes in makeup, lighting, camera angle and expression can create the appearance of lifting or slimming. Judge the routine by comfort, consistency and subtle personal changes rather than expecting it to reproduce cosmetic-procedure results.
Face Yoga Safety
Facial exercises should never cause sharp pain, numbness, prolonged twitching or joint discomfort. Mild muscular fatigue may occur when you are new to the routine, but it should settle quickly. Reduce the number of repetitions or stop the responsible exercise when discomfort continues after the session.
Avoid dragging, pinching or aggressively stretching the skin, particularly around the eyes. Repeated facial contractions contribute to expression lines over time, so movements that constantly crease the forehead or squeeze the eyes may work against your goal. Use light resistance and prioritise relaxation after every contraction.
Ask a qualified clinician before beginning if you recently had facial surgery, dental surgery, fillers, botulinum toxin injections or thread treatments. You should also seek individual guidance when you have facial paralysis, uncontrolled jaw pain, an active skin infection or a condition affecting facial movement.
Stop practising and obtain medical advice if you develop new facial weakness, sudden asymmetry, difficulty speaking, severe headache or problems closing one eye. These are not normal exercise effects. Sudden facial drooping, particularly with arm weakness or speech changes, requires immediate emergency evaluation.
Support Firmer-Looking Skin
Sun protection has stronger support for preventing premature skin ageing than facial exercise. Dermatologists recommend daily broad-spectrum, water-resistant sunscreen with an SPF of at least 30, along with shade, protective clothing and sunglasses. UV exposure accelerates wrinkles, uneven pigmentation and loss of skin quality.
Apply a suitable moisturiser after cleansing to support skin hydration. Moisturiser temporarily improves the appearance of dry, fine lines by trapping water in the skin. Cleanse gently rather than scrubbing, and stop using non-prescription products that consistently sting, burn or leave the face irritated.
Avoid smoking and limit habits that repeatedly expose your skin to avoidable damage. The American Academy of Dermatology identifies smoking, tanning and excessive alcohol consumption as contributors to premature skin ageing. A balanced diet, regular physical activity and sufficient sleep support general health as well as your appearance.
Consult a board-certified dermatologist when sagging, pigmentation or wrinkles significantly concern you. A dermatologist can explain realistic options based on your skin type and goals. Face yoga may remain part of your self-care routine, but it should complement—not replace—proven sun protection and appropriate professional care.
Face Yoga: 10 Exercises for a Firmer, Younger Look
Face Yoga offers a free and accessible way to engage facial muscles, improve movement awareness and release habitual tension. The 10 exercises in this guide target the forehead, eyebrows, eyes, cheeks, mouth, jawline and neck using controlled contractions rather than forceful pulling.
Research suggests that a consistent facial exercise programme may modestly improve cheek fullness in some middle-aged women. However, the strongest study was small, lacked a control group and did not show clear improvements across most wrinkles or facial areas. Broader reviews continue to describe the evidence as limited and inconsistent.
For a safe routine, use light resistance, avoid repeatedly creasing the skin and stop movements that cause pain. Practise for approximately 10 minutes, three to five times per week, and allow several weeks before evaluating subtle changes. Do not expect exercises to reshape bone, remove facial fat or tighten significant skin laxity.
Combine facial exercises with daily sunscreen, gentle cleansing, moisturiser and healthy lifestyle habits. These steps offer a more complete approach to maintaining healthy-looking skin. A realistic routine should leave your face feeling relaxed and comfortable—not sore, strained or pressured to look permanently younger.
Frequently Asked Questions
Does face yoga really make you look younger?
A small study found modest improvements in cheek fullness after 20 weeks, but evidence remains limited. Face yoga may create subtle changes for some people, but it cannot guarantee a younger appearance or replace cosmetic treatment.
How often should you do face yoga?
Start with approximately 10 minutes, three to five days per week. Use gentle movements and take rest days if your facial muscles, jaw or neck feel tired or uncomfortable.
Can face yoga remove a double chin?
There is no strong evidence that face yoga selectively removes fat beneath the chin. It may engage neck and lower-face muscles, but genetics, body fat, skin elasticity and anatomy largely determine the area’s appearance.
Can facial exercises make wrinkles worse?
Forceful, repetitive expressions may deepen creases over time. Keep the skin relaxed, use light resistance and avoid exercises that repeatedly scrunch the forehead, squeeze the eyes or pull aggressively around the mouth.
What is the best time to practise face yoga?
You can practise in the morning or evening, depending on your routine. Choose a time when your face is clean, your hands are washed and you can concentrate on slow movements without rushing.